

OmniWorkflows
Build visual automations that connect triggers to actions like Voice AI calls, CRM updates, and messaging.
OmniWorkflows is a visual, drag-and-drop automation builder. You connect a trigger (something that starts the flow) to a sequence of steps (calls, messages, CRM updates, and logic), so work happens automatically without writing code.
What you can automate
- Call every new lead within two minutes of sign-up.
- Retry calls that were busy or went unanswered.
- Alert your sales team on Slack and email when a call finds a hot lead.
- Call a customer back at the exact time they asked for.
- Score leads with AI and send each group to the right campaign.
- Keep your CRM updated after every call.
Where to find it
In the dashboard sidebar under Voice AI Setup, open Workflow.
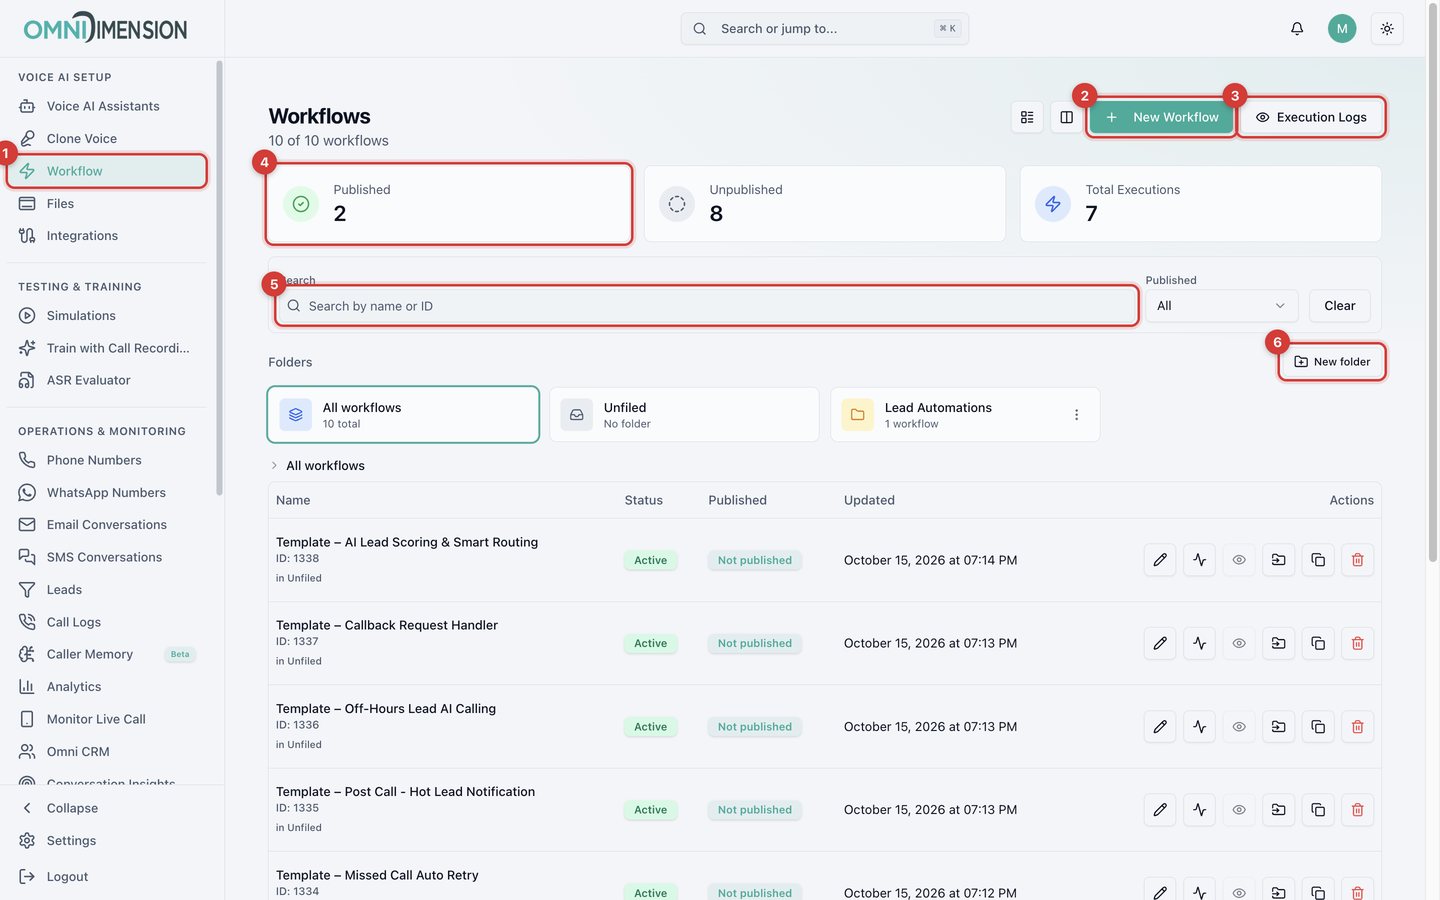
- Workflow in the sidebar opens this page.
- New Workflow starts a workflow from a blank canvas or a template.
- Execution Logs shows every run of every workflow.
- Summary cards count published and unpublished workflows and total runs. Click a card to filter the list.
- Search by workflow name or ID.
- New folder groups related workflows.
Words you will see
| Term | Meaning |
|---|---|
| Trigger | The event that starts a workflow, such as a new lead or an incoming WhatsApp message. Each workflow has exactly one. |
| Node (step) | A box on the canvas that does one thing: place a call, send an email, check a condition. |
| Connection | The dotted line between two nodes. It sets the order nodes run in. |
| Branch | A labeled exit on a node, such as TRUE and FALSE or COMPLETED and REJECTED. Each one can lead somewhere different. |
| Draft | The version you are editing. Saving a draft does not change what is live. |
| Published | The live version. Real events always run the published version. |
| Execution (run) | One pass through the workflow. A run is either a Test you started or a Production run started by a real event. |
| Variables | Information from earlier nodes, such as a lead's name or a call's outcome, that later nodes can use. |
Learn by level
Create a workflow
Start from a blank canvas or one of 10 ready-made templates.
The builder
A tour of the canvas, the settings panel, connections, and branches.
Your first workflow
Build a lead follow-up that calls hot leads and logs cold ones.
Test and publish
Run a test with sample data, then make the workflow live.
Execution logs
Find any run and see what every node received and produced.
Manage workflows
Folders, duplicates, and the actions on each workflow.
Node reference
Every trigger and action, with its settings and exits.
Passing data between nodes
Use a lead's details or a call's result in later nodes.
AI scoring and routing
Let AI score leads and route each group with a Switch.
Templates and patterns
Proven setups for retries, callbacks, business hours, and alerts.
Example: from new lead to follow-up
Queue leads in a Dynamic Campaign, then act on each call's result with a post-call workflow.
Build with the API
Create, edit, test and publish workflows over the REST API, for an integration or an AI agent.
Troubleshooting
What each warning means and how to fix it.
Video walkthrough
Was this page helpful?